Thursday 31 March 2011

Implied Lines

From the examples given in the exercise book, I have indicated the implied lines below:


Here I have found some examples from my own photography of implied lines.

Here the statue is pointing to the house in the background - an example of eye extension

Here the car leads to the background view

Here the lines in the shaded part of the cathedral point to the lighter area.


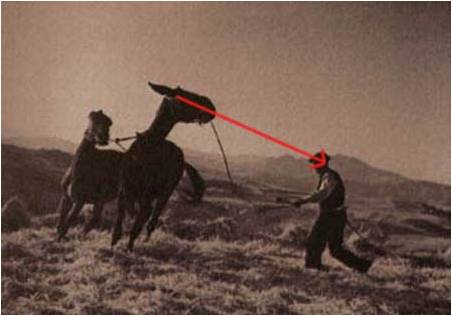
Eye Line - here the person in the foreground is clearly looking at the camera, however in the background your eye is draw towards the dog where the person is looking.

Tuesday 15 March 2011

Curves

Here I tried to find curves, however I feel the location I chose somewhat restricted my choice, as I was looking for curves predominantly in nature.

Here the pathway curves around and leads the eye into the scene.


The hedgerow makes a natural curve to lead the eye to look at the river.


Here the manmade bridge provides a smooth curve which is reflected in the river.


Here the fences emphasise the curve of the pavement leading the eye into the scene.

Diagonals

While taking vertical and horizontal lines, I also looked for diagonals.  These were easier to find, though the subject does not vary much (due to the nature of my location being very rural).

Here the diagonal lines are most clear in the shadows.

Here they are shown in the river.

Here in the path.

And here in the posts and riverbank.

Horizonal and Vertical Lines

For this exercise I went out and looked for horizontal and vertical lines to photograph.

Horizontal Lines
Here the line is provided by the signposts.

Here they are provided by the metal bars in the concrete.

Here they are in the fence posts.

And finally in the bridge (although it is slightly obscured by the bush in the foreground)

Vertical Lines

In this photo the vertical line is the post.

Here the lines are the bullrushes.


The vertical line dominates this photo.

And here there are 3 vertical columns.

Multiple Points

For this exercise I have used a still life arrangement, adding an item in each photo.


Here I have shown with lines how the lines in the final composition relate with each other.

Wednesday 2 March 2011

The relationship between points

Here I took photos of 2 prominent buildings from different viewpoints.

Image 1

Image 2

Image 3

Image 1: Both buildings are at a slight angle.  The white building takes up a little more of the composition, though both buildings look around the same size. This is the most pleasing composition to the eye.

Image 2: Here the white building is larger and the church appears in the distance.  It looks like the church is a smaller detail in the composition.

Image 3: Both buildings are face on, and it is far less appealing.  It makes the composition look flat and uninteresting.

Extreme close-up of eyes

As described in the Exercise this has an unresolved feel to it, it is quite un-nerving!

Positioning a Point

Here I have taken a photo with one point of interest at different positions.

1. Left bottom

2. Right top

3. Right bottom

1. This composition is quite easy on the eye as the lines naturally go in the same direction.
2. There is too much space at the bottom of this composition with no detail in it, making it less pleasing to the eye.
3. There appears to be too much space to the left of this image.

This image shows the main point of focus of image 1.